Configure the Self-Service Portal
CloudShell Portal is a self-service web client. This article describes how to configure the CloudShell Portal.
In this article:
Tip: If you are installing or upgrading CloudShell, this CloudShell Portal configuration wizard will open automatically as part of the setup process. if you are manually updating the application, open the wizard, as explained in Configure Application Settings.
Install the required IIS version
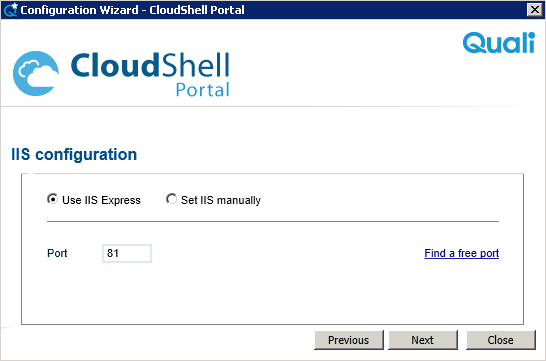
CloudShell Portal requires a compatible IIS site. You can install and configure the IIS site manually or select the Use IIS Express option to have CloudShell do it automatically.
Use the IIS configuration window to install the required IIS version.
The portal is installed in the folder:
C:\Program Files (x86)\Qualisystems\CloudShell\Portal
Configure the session timeout interval
- Go to the <Installation drive>\Program Files (x86)\QualiSystems\CloudShell\Portal\Web.config file.
Set the CloudShell Portal timeout interval using the “timeout” attribute in the “sessionState” element.
The value that is specified for the “timeout” attribute determines the CloudShell Portal session timeout interval in minutes.
In the Web.config file, the following XML lines contain the “timeout” attribute:
<system.web><sessionState timeout="120"></sessionState>This default setting means that the CloudShell Portal timeout interval is set for 120 minutes.
An alert message is issued shortly before the timeout, so if you do modify the timeout interval, do not use a setting that is six minutes or less.
- After modifying the
Web.configfile, save it, restart the IIS, and clear the browser cache.
Note: Any modification that you make to the Web.config file is overwritten during an upgrade of the CloudShell application.
IIS configuration with IIS Express
When the Use IIS Express option is selected, setup installs IIS Express if it does not already exist on the server machine:
- CloudShell installs an IIS Express version that is compatible with the OS platform.
- Earlier versions of IIS Express are uninstalled from your machine.
The default configuration uses port 80 as the port number and localhost as the address. You can configure these settings during the installation, or modify them later by launching the Quali Server configuration utility.
To load the portal:
- Open a browser and enter the
localhost:Port# addressfor a local machine, or theIP:port/DNS:port addressfor remote access. - In the Administrative Tasks window (see Admin Configuration Settings), set the admin password, email, and SMTP settings, assign users to groups and domains, and update data.
- Optionally, designate the port manually by entering an available port number in the
Portfield text box. The installer notifies you if the port that you specified is unavailable. - Open IIS Manager, select Request Filtering, click HTTP Verbs and make sure the PUT and DELETE verbs are enabled on the website.
IIS configuration using the IIS manual option
Manual IIS configuration is a three step process:
- Install IIS 8.0 on Windows Server 2012
- Enable dynamic compression on your IIS settings
- Configure the IIS website for CloudShell
To install IIS 8.0 on Windows Server 2012:
- Perform the steps provided in the Microsoft TechNet site .
If IIS 8.0 is already installed, or if you are installing it now, make sure that http dynamic compression is enabled.
To enable dynamic compression:
- Install dynamic content compression on your IIS.
Follow the instructions on https://www.iis.net/configreference/system.webserver/httpcompression#003.
- Open the c:\windows\system32\inetsrv\config\applicationHost.config file and add the following keys:
- Under
<dynamicTypes>:<add mimeType="application/xml" enabled="true" /><add mimeType="application/json" enabled="true" /> - Under
<staticTypes>:<add mimeType="application/x-javascript" enabled="true" />
To configure IIS:
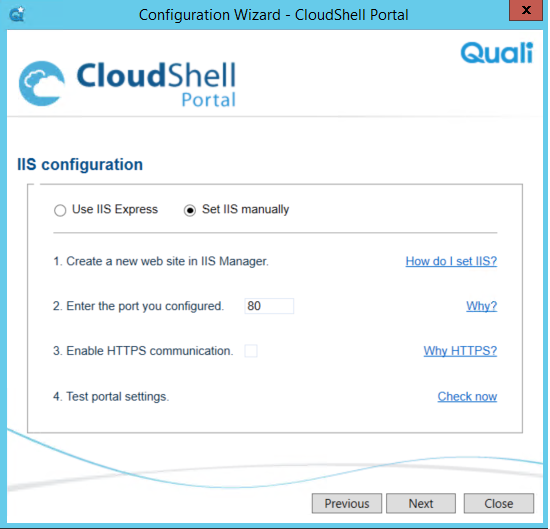
When the Set IIS manually option is selected, the IIS configuration window is displayed.
- Proceed with the configurations described in the following topics:
Create a new website in IIS Manager
This procedure assumes that CloudShell Portal and Quali Server are installed on the same machine.
To create a new website in IIS Manager:
Open the IIS Manager by running the following command at the command prompt:
inetmgr.mscIn the Connections window, right-click Sites.
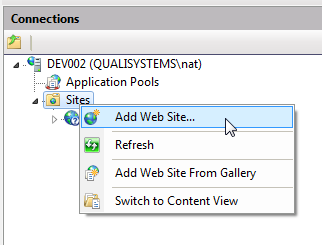
In the context menu, select Add Web Site.
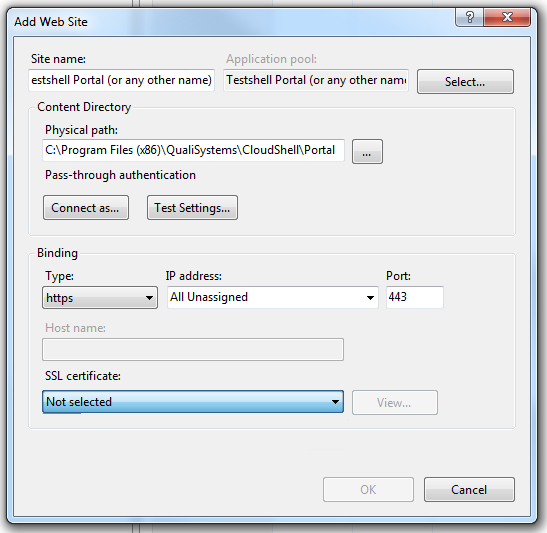
- Define the web site settings as follows:
- In the Site name field, specify a name for the site.
- In the Content Directory field, specify a Physical Path, pointing to the portal folder.
- (For HTTPS only) Set the Binding Type to https.
- (For HTTPS only) Set your SSL certificate.
Click OK to submit the changes.
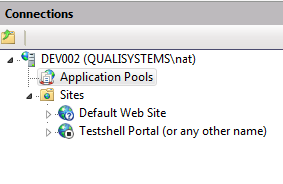
In the Connections window, right-click Application Pools.
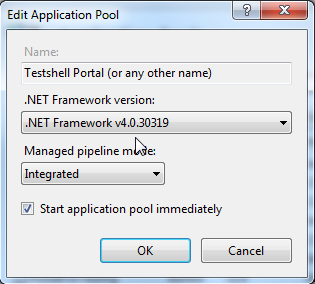
- In the Edit Application Pool window, edit the application pool that was created for your website. Modify the .NET Framework version to 4.0-4.6.1.
Go to the ~\Qualisystems\Cloudshell\Server\customer.config file and change the value for
LoadIISExpresstoFalsein the following key:<add key="Portal.LoadIISExpress" value="False" />- In IIS Manager, do the following:
- Click the website, select Request Filtering, click HTTP Verbs and make sure the PUT and DELETE verbs are enabled on the website.
- Start the website.
- Restart the Quali Server.
Browse to the website and test it.
Note: Skype and perhaps other applications might block certain ports. For example, Skype blocks the default HTTPS port 443.
If error message HTTP Error 500.19 is issued, do the following:
- Open the control panel's Windows Features dialog box, and add Internet Information Services > World Wide Web Services > Application Development Features > ASP.NET 4.6 (If ASP.NET 4.6 is missing, select the latest available version).
- Click OK.
- If you are using IIS 8 with Windows Server 2012 or Windows Server 2012 R2, make sure to install the 'Web Server' role within the server manager.
After selecting the web server role, click Next and in the Role Services section, under Application Development, select ASP.NET 4.5.
This sub-role enables IIS to use the ASP.NET 4.5 for running the CloudShell Portal.
- Proceed to Enter the port you configured.
Enter the port you configured
In order to test connectivity, the CloudShell Configuration Wizard requires the port number.
To specify the IIS website port:
- In the IIS configuration window, in the Enter the port you configured field, specify the port that you entered in the Add Web Site window.
Enable HTTPS communication
In the IIS configuration window, in the Enable HTTPS communication field, select this checkbox if HTTPS is the IIS website's communication protocol (configured in Create a new website in IIS Manager). This will allow the CloudShell Configuration Wizard to test connectivity over HTTPS instead of the default HTTP.
Leave the check box blank if you are using HTTP as the communication protocol.
Test portal settings
To test the portal settings:
- In the IIS configuration window, click Check Now.
- Click Next.
- If a "CloudShell Portal could not be contacted." error is displayed, perform the steps in Manual IIS Installation Error.
IIS configuration changes when browsing to CloudShell Portal
When using Windows Server to run CloudShell Portal using IIS version 7.0 and above, you must modify the Web.config files in order for CloudShell Portal to work properly.
To modify the Web.config file:
Go to the <Installation Drive>\QualiSystems\CloudShell\Portal \Web.config file and locate the following XML element:
<configuration><system.webServer><modules>Add the following element under it:
<remove name="WebDAVModule" />Locate the following XML Element:
<configuration><system.webServer><handlers>Add the following element under it:
<remove name="WebDAV" />- Save the Web.config file.
- Restart CloudShell Portal.